


Here's what we started with. The galvanized roofing and the cedar posts are for the as yet unbuilt run (that will be part 2 of this post). The rest of the lumber and the OSB board is for the indoor coop. The idea was to build the coop into the garage to save room in the side yard for a large covered run. OSB isn't the most attractive choice, but since that's what the inside of the garage is made of, we figured it wouldn't hurt to continue the look.
 The framing. The structure is 4x8 and leaves just enough room to park a car in the garage. The consensus on Backyardchickens.com is that chickens need at least 4 square feet per bird in the coop and 8 square feet in the run. 32 sq ft leaves plenty of space for the girls in the coop, plus they'll have a 13x5 run, which gives them way more than 8 sq. feet of outdoor space. It's a little smaller than the coop they're used to, but it should be plenty of space.
 We decided it would be best to give the structure its own roof so that chicken dust doesn't permeate the rest of the garage.

Ben bought the door used at our local Restore. Again, we weren't going for looks in the inside part of the coop.....
At this point, Ben ran electricity to the structure and installed an overhead light on a switch.

Here's how he left it Sunday night.... chicken observation window installed, overhead light connected and working.....

Today he added the pop door, an outside window, and the roost, nest box, and feeders. Here's the hole for the chicken door.

He cut the door itself from an old ugly light cover from Restore. It's cute - I may have to paint it red though, just so it matches the rest of the house. (I took the price tag off right after I took the picture.... $3.99)

The hole cut for the outside window. The chickens have an excellent view of the neighbor's TV. Maybe they'll start following her soaps!

Here's the window going in in the rain. We bought the cheapest window you can get at Menards, and we got what we paid for. Luckily chicken's aren't picky.

The finished garage coop, or the OSB Hut as Ben puts it. It's cute! I think I may paint it eventually, just for kicks. You can see our red fence through the outside window in this picture.
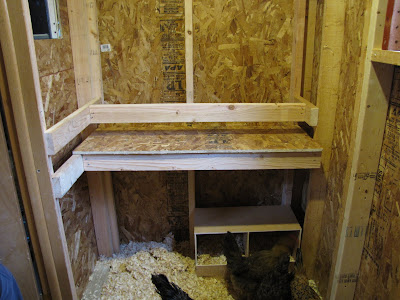
This is just to the left of the door. Roosts, poop board, and nest boxes. The roost is at 3'6", with the poop board 6" below that. I'm a little concerned that the girls won't be able to easily get up there, but I don't think it will be a problem. The nest boxes I bought online for $20. Basically just a bunch of plywood that Stanley and I screwed together. I think eventually we'll build something a little fancier, hopefully making it so that we don't have to go in the coop to collect eggs.
I will have to get some linoleum for the poop board soon, so I can easily scrape the girl's nightly poos into a bucked for composting. The OSB board will do for now though.

The wall mounted feeders I got from eNasco, a local mail order company. They were only about $5 a piece, and worth every penny. I'm really hoping that they won't waste as much feed as the trough feeder in the old coop.

Today was the last day of my lease at the Marquette Street house, so I needed to get the girls over here. I woke up early and went over to clean the old coop. In order to do that I had to kick the chickens out, leaving them out in the rain for the majority of the day. They seem to be adjusting, but there's no doubt that it's been a hard day for them.
I found them this evening all piled up in the corner by the feeder trying to sleep, so I picked them each up and put them on the roost, which they seemed to appreciate. They're all sleeping peacefully now.... tomorrow we'll let them out into the side yard to free range a little. Ben should be back to build the run sometime this week.

Before I sign off, I wanted to show off my new composter. I had thought about trying to make something like this, but I didn't have the time or inclination, so I bought this one from Rainbarrels and More, an online company based in Indiana. They're repurposed pickle barrels that originally were used to ship sweet pickles from India. My plan is to fill one and let it compost while I'm filling the other. It should allow me to have an easy continuous system for chicken poo and food waste. They rotate really easily, which should help them compost quickly.

The lids are cool - almost like a Ball jar with a ring that screws on and holds a cap in place. Lots of airholes for ventilation, and to let rainwater it.

The bars that go through the middle should help the compost get mixed well as we turn it. Pretty cool!
Look for part 2 of the new coop soon!
share on: Facebook


No comments:
Post a Comment
Note: Only a member of this blog may post a comment.