1.31.2009

Maple Bacon Roasted Roots

This dish was inspired by the bacon Brussels sprouts I made for Thanksgiving. This was much easier though, and I liked it a little better. The Brussels sprouts were almost too rich - this ended up hearty, but not too intensely bacon-y. Thanksgiving it supposed to be about decadent food though, so I'm certainly not criticizing the sprouts!

I started out by frying up four slices of local organic uncured bacon. I usually cook bacon too hot and burn it, but I did well this time. It ended up crispy, but not burnt.

I pulled a bunch of local root vegetables out of the fridge, but I ended up not using the rutabaga and one of the carrots. I was cooking for just myself, so there was no point in making WAY too much. I still have plenty of leftovers with the veggies I did use.

I chopped the veggies into small cubes - it ended up being mostly celariac and yam.....then put them in a pie plate and mixed them with the crumbled bacon and some walnuts. I added a bit of (local) maple syrup to the pan with the bacon grease, let it dissolve, and then poured the mixture over the veggies and mixed it all up well.
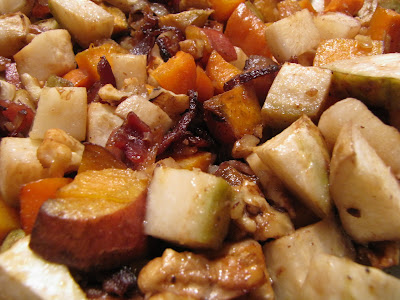
It roasted in a hot oven for about a half hour or 40 minutes. It was really really good! The maple syrup was subtle, but added the perfect sweet touch to the bacon's saltiness.

I crumbled a bit of local blue cheese on top in my bowl. Superb!


Maple Bacon Roasted Roots

Root Vegetables - As many as you want. Any roots will work.
Bacon - About 1 slice per cup of vegetables.
Chopped Walnuts
Maple Syrup - To taste. I used about 1 tablespoon for 1.5 cups vegetables
Blue Cheese

Preheat oven to 425 degrees. Fry bacon until crispy. Set it aside and let it drain on a paper towel. Meanwhile, cut up roots into whatever size chunks you like. Put vegetables into a baking pan. Crumble bacon and add to roots, along with walnuts. Mix maple syrup in hot pan with bacon grease. Pour liquid over vegetables and mix well to coat. Roast until vegetables are tender, probably about 30 to 40 minutes. Take out of the oven and stir occasionally during cooking to make sure vegetables don't stick.


share on: Facebook

A Winter Bounty

I just had to take a picture of my farmer's market haul from this morning. Only about $30 bought me all this food! Ida Red apples, a gallon of fresh cider, parsnips, carrots, onions (Copras, which are the same variety I made french onion soup with this fall, but oh so tiny compared to Ed's!) garlic, and a big hunk of Braunschweiger! What's Braunschweiger, you ask? It's a Wisconsin favorite - basically a smoked liverwurst-like spread that's just delicious on sandwiches. I remember eating this on vacations at my grandparents house....it's one of those old-fashioned foods that's gone pretty much out of style....

Add to that the local stuff already in my cupboard, fridge, and freezer: cabbage, a big rutabaga, turnips, potatoes, shallots, milk, eggs, butter, cheese, honey, maple syrup, sorghum syrup, ground beef, uncured bacon, ground pork, ground ostrich.... (ostrich??? yes, I stopped by Artemos Meats on the west side the other day. The ground ostrich was local and reasonably priced, so I figured - why the hell not? I'll have to do some research before I cook it - I have absolutely no idea how to cook ostrich!) Anyway, the point is I have a lot of great local food in the house! I'm feeling like I'll easily live up to my vow of no California lettuce or green veggies this winter.
share on: Facebook

Cabbage Quesadillas

It was Friday night and the cupboard was bare....I didn't want to spend a ton of time making dinner and I was at the point of saying the hell with it and ordering out when.....I thought of cabbage quesadillas! Cabbage is one of the rare Wisconsin winter vegetables that's popular in Mexican cooking. I've never seen a cabbage quesadilla on a menu, but it seems conceivable.

I've been eating a lot of this local savoy cabbage. It's pretty much the only local semi-leafy vegetable that's left, and I've made a vow not to buy California lettuce this winter.

This is hot salsa that Dave made this summer with peppers from the family garden plot. It's been in the freezer, but he recently pulled it out to thaw. I think his plan is to process it and bottle it as hot sauce - right now it's pretty chunky.

I added the juice of a few limes and three big spoonfuls of hot sauce to the cabbage and let it cook for a few minutes.

These tortillas had been in the fridge way too long, and were quite stale, but still fine for quesadillas. The oil and heat from the pan moistens them sufficiently. the cheese is local jack.

After just about 5 minutes, the cabbage was cooked down to about half it's original size.

I melted a liberal amount of butter (homemade!) in the pan and put the first tortilla in. First, the cheese went on....

....then half of the cabbage. The cabbage mixture got pretty juicy as it was cooking so I used a slotted spoon to strain it a little.

When the cheese started to melt I flipped it and added the second tortilla.

These turned out exceptionally golden and beautiful. It must have been the butter! The cabbage was really mild , but it added a nice texture. The hot sauce was way hotter than I anticipated (note to self: don't add hot sauce to anything without testing it first!) but it was still quite good. The sour cream helped cook it down a bit. I'm certainly glad I didn't order out!


Cabbage Quesadillas
About 2 cups shredded cabbage
Juice of 1 or 2 limes
Hot sauce (or salsa) to taste
Two flour tortillas
Shredded Monterey Jack cheese (as much or as little as you want.)
Butter for the pan (more butter = better quesadillas)

Combine the cabbage, lime juice, and hot sauce or salsa in a saucepan and cook on medium heat until tender (about 5 minutes.) Meanwhile, shred cheese and get butter heating in a cast iron skillet. When pan is hot, add a tortilla. Put half the shredded cheese on the tortilla, topped with half the cabbage (lift cabbage out of pan with a slotted spoon to let the juices drain.) When cheese starts to melt, fold quesadilla in half and cook till cheese is completely melted. Flip if you think the other side needs more cooking. Repeat with second tortilla and fillings. Serve with a big dollop of sour cream.

share on: Facebook

1.22.2009

A Brined Bird with Soup a la Dave

My little brother and I had our older brother and sister-in-law over for dinner on Sunday, and we decided to roast a chicken. Roasted chicken seems like the perfect Sunday dinner to me....it's delicious, and it fills the house with wonderful smells all afternoon as it's cooking. We'd both heard good things about brining chicken, so we decided to try it.

For the first course we had a pureed root vegetable soup that Dave had made the night before. I wasn't even home when he made it, but he took some pictures, so I figured I'd put them up.

Dave tends to cook almost everything in his trusty cast iron skillet, which is not a bad way to go. He started with half a red onion from the farmer's market....

...added a bunch of potatoes (also from the market.) There's some regular red potatoes here, and also a red rose, or similar red fleshed variety. They seem to cook and taste like regular potatoes, but the color is just beautiful!

Next he added spices - cinnamon, nutmeg, and cloves I think? Plus some hot sauce to spice it up.

Next came some local carrots....

He added some pre-made (Imagine brand I think) organic butternut squash soup and cooked it all till it was soft and puree-able. The Imagine soups are good, but I probably would have used some plain chicken broth....oh well, if he's cooking and it tastes good, I won't complain!

And here it is - Nice job Dave!!

Mid-day Sunday, we started brining the chicken. We bought it frozen at the farmer's market on Saturday. It was still a little icy on Sunday morning, but we decided to start the brining anyway. It's supposed to brine for 4-12 hours, and we didn't want to cut it too short.

The most simple brine is salt and water, but we decided to jazz it up a bit. We used salt, sucanat, a local shallot, bay leaves, ginger, some Good Earth tea (a sweet/spicy herbal tea) and about four cups of local apple cider.

We combined all this, plus about two quarts of water on the stove and let it boil for a few minutes. It made a really crazy looking witches-brew like concoction that smelled wonderful.

Once the liquid had cooled a little, in went the chicken. It floated to the top, so we put a wooden cutting board over the top to weigh it down.

After about five hours of brining, I pulled the chicken out and got it ready for the oven. It was hard to tell if the brine had done anything, it looked like a regular chicken to me, but as it started to cook, you could smell apple cider and spices. I started it off pretty hot (450) for about 15 minutes, then turned it down to 350 for the remaining time. I also turned it several times while it was cooking so it would get evenly browned. Since it wasn't stuffed it didn't take too long to cook - just about two hours.

At about the halfway point I pulled it out and added some red cipollini onions and little roasting potatoes from the farmer's market.

And here's the finished product! The apple cider caramelized on the skin - just beautiful!

The first course was soup - spicy, and hearty.....

Followed by chicken and potatoes. The flesh was just delicious - you could really taste the subtle flavors of apple cider, ginger, and spices. Not bad for our first dinner party in our new house!
share on: Facebook

1.16.2009

Variations on a Squash

I've had this Black Futsu squash since Thanksgiving. It was one of the many vegetables gifted to me during my trip to Portland over the holiday weekend - thanks again Bill!

It made the cross-country trip with me a few weeks ago, and has proved to be a very hardy squash indeed. I also brought a Long Island Cheese squash that didn't fare so well. I left them both in the car overnight in freezing cold temperatures and the Long Island Cheese was badly frost damaged by the time I arrived in Madison. It had big squishy spots and was obviously no good for eating. This Black Futsu on the other hand came through like a champ! It suffered through the same cold temperatures, but was still intact at the end of the trip. It was a little soft, but definitely still edible.

Since this squash seemed to be a survivor, and I knew it would be quite tasty, I decided to save the seeds to plant in the spring. I'm not sure where I'll have space to garden this summer, but I'll figure something out. There's a lot of community gardens around here....

You can see a lighter yellow band around the outside - I think that's a little bit of frost damage, but it smelled fine so I decided to go ahead and cook it.

I rubbed it inside and out with olive oil, put the halves face down in a baking dish, and roasted it at 425 for a half hour. Small squashes like this don't take too long to cook, which is nice.

While the squash was baking, I prepared the kale. This is Lacinato kale I bought at the Yahara Co-op in Stoughton, but it's originally from California. It's organic, but it's from Pure-Veg, a label that I don't trust to have good labor practices....oh well, we can't all be perfect. There's something very satisfying about a dark green kale like this - it's hard for me to resist.

I cooked it simply in olive oil in the cast iron skillet, adding a tiny bit of apple cider vinegar at the end.


The squash was nice and soft after just a half hour of roasting.

I stuffed it with the kale, drizzled a little more olive oil on top, and sprinkled it all liberally with grated Romano cheese. Sometimes it feels so good to have such a pure, healthy meal....

I'm home alone this week, so I still had another squash half in the fridge to eat the next day. I decided to try a variation on the stuffed squash theme, this time with ground lamb.

I started by sauteing a (local) red onion in a little bit of olive oil in the cast iron skillet.


When the onions had started to get limp, I added some local ground lamb from the Yahara Co-op and a little bit of powdered thyme. (I've never cooked with powdered thyme, but my brother had some in the house, and I'm beginning to really like it.)

When the meat was nicely browned and the onions were translucent, I took the squash half out of the fridge, stuffed as much of the lamb/onion mixture in as I could, and topped it off with some grated (local) Monterrey Jack. It went in a hot oven (425) for just about 15 or 20 minutes.

While the squash was cooking, I made this beautiful local cabbage salad with the last of the Pure Veg Kale. I dressed it simply with balsamic and olive oil. This is definitely a chewy salad, but I kind of enjoy the texture. It's quite hearty, and a good workout for the jaw muscles!

Here's the squash right out of the oven. On a whim, I ate it with some homemade yogurt I had made earlier on the week, and I sprinkled a little more of the powdered thyme on to make it pretty. It made a great tangy sauce and complemented the other flavors really well!
share on: Facebook

1.13.2009

Easy Breezy Apple Cider Beef Stew

I have to write a quick post about tonight's dinner - it was perfectly easy, and a wonderful warming meal for a cold winter's night. The picture above is the beginning of the process. I browned some local grass-fed stew meat that I got at the Yahara Co-op in a little bit of olive oil and a dusting of flour, and then added chopped leeks (not local, but in the fridge and needing to be used,) and local carrots, celeriac, and turnips. It was then that I remembered that I didn't have any stock or red wine in the house to use as a cooking liquid, so I decided to try using what I did have: local unpasteurized apple cider.

Here it is. I bought this at the indoor market on Saturday - it's completely fresh and completely delicious. I think the farmer said it was pressed on the 7th of January. I was a bit worried it would make the stew too sweet, but I added it anyway about half and half with water. I also added a bit of powdered thyme and salt. The apple cider is a strong flavor, so I didn't want to get too carried away with seasonings.

This picture didn't turn out very well (I'm making do with my old digital camera while I wait for the shiny new one I just bought to arrive,) but this is the stew right after I added the liquid. I put a lid on it (a little cockeyed to allow steam to escape) and cooked it on low for about two hours.

It turned out perfectly! All in all, I only spent about 15 or 20 minutes on this, cutting up the veggies and browning the meat. It took a while to cook, but overall it couldn't have been easier - and boy was is good!

The stew went perfectly with this simple cabbage salad: local savoy cabbage, carrots, and some California kale that I indulged myself in. I dressed it simply with some olive oil and apple cider vinegar to go with the apple cider theme.

The stew was steamy and delicious! Just the thing for a cold winter's night! The apple cider mellowed out with cooking - It had a mild sweetness that complemented the beef and root veggies very well. Eating locally in Wisconsin isn't so bad (at least not yet!)
share on: Facebook